WordPress Setup on Bluehost
WordPress setup on Bluehost is even easier than most other hosts as it is literally one click.

Even though it is super simple I’m going to walk you through the process. We will assume you have decided to get your domain name FREE domain through Bluehost. This option makes it even easier again as we don’t need to update DNS records.
If you already have a name with a different Registrar, don’t worry. It’s still very easy. Take a look at the story I have written on how to redirect your domain nameserver records. Follow those steps and then join me back here.
It will take you only a few minutes to set up your new blog with Bluehost. Everything is so streamlined, I also have some screen grabs to help step you through.
Why I Chose Blue Host to Host my Blog!
In the previous story, I gave you my Best hosting options. So if you’re not quite sold on Bluehost you can go back and take a look at the alternatives.
Although there are some other great hosts, Bluehost is number 1 on the WordPress.org list which is a huge endorsement, take a look at the Top Host Providers.
I have chosen Bluehost as the perfect beginner’s host for a few reasons:
- It’s very affordable!
- The servers are stable.
- Signup and setup are simple for beginners.
- WordPress is a one-press setup.
- Free domain for the first year.
- Free SSL
- Free CDN
- Fabulous support.
Pre-Setup Step
Have you chosen your domain name? Yes
Are you going to register through Bluehost? Yes
Awesome! Skip ahead to Step 1!
Have you chosen your domain name? No
Take a look at how to Choose the best Domain Name. Follow the steps there, then come back over here to register.
Step 1 – Setup Bluehost account

- Go to Bluehost and select “Get Started”.
- Select your hosting plan.
- There is no need to get an expensive plan. Choose the cheapest option, the “basic” plan.
- Don’t choose monthly payments!!! This is important! Firstly because it is cheaper if you choose an annual plan or longer. Secondly, if you chose a monthly plan and your credit card expires, gets canceled, or goes over its limit your whole site will go DOWN!! This is a Google no-no!
- Plus you can always upgrade to a higher plan later if you need it.
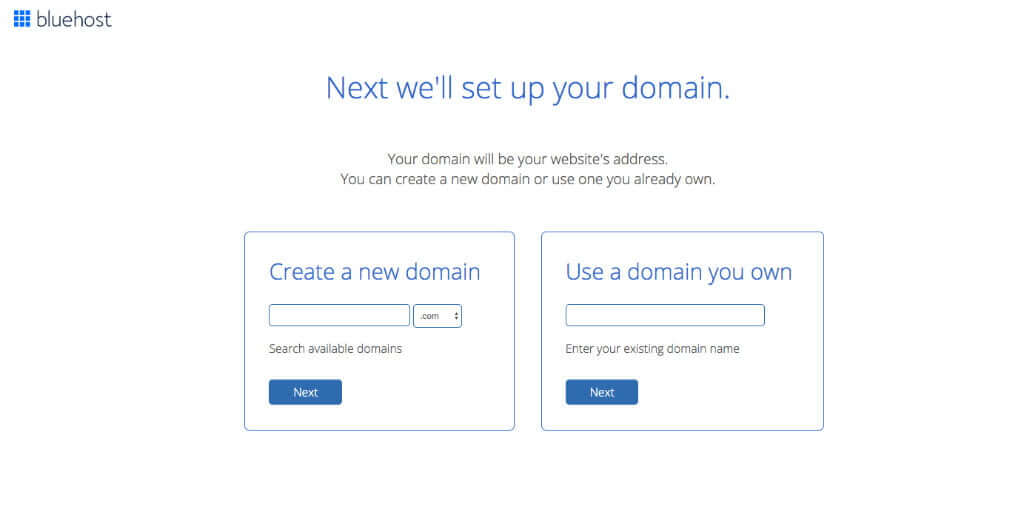
Step 2 – Add your Domain to the Bluehost Account
Okay, now things are getting exciting! This is where you choose to either enter your domain if you have already purchased it from another registrar or create your new domain!
- Complete your details on the next screen.

Step 3 – Select Hosting Package
On the next screen, you will need to make some choices regarding the hosting package you would like to purchase.
- Choose the Basic Plan
- Take the plan at the yearly rate or longer
- The is SSL certificate included (don’t add an extra one in the options below)

Notice I haven’t selected any of the optional extras. The other options, Sitelock Security, Codeguard, and SEO Tools can all be covered by free plugins, Wordfence and Yoast, etc. So don’t choose these options. I will cover the plugins you will need to add to your blog in a later story.
See, I saved you some money!
So, deselect all the optional extras. Please note, if you selected 36-month hosting you may have been given the option of choosing Domain Privacy Protection. If that is an option I would choose that option only!
Then just pay the bill!
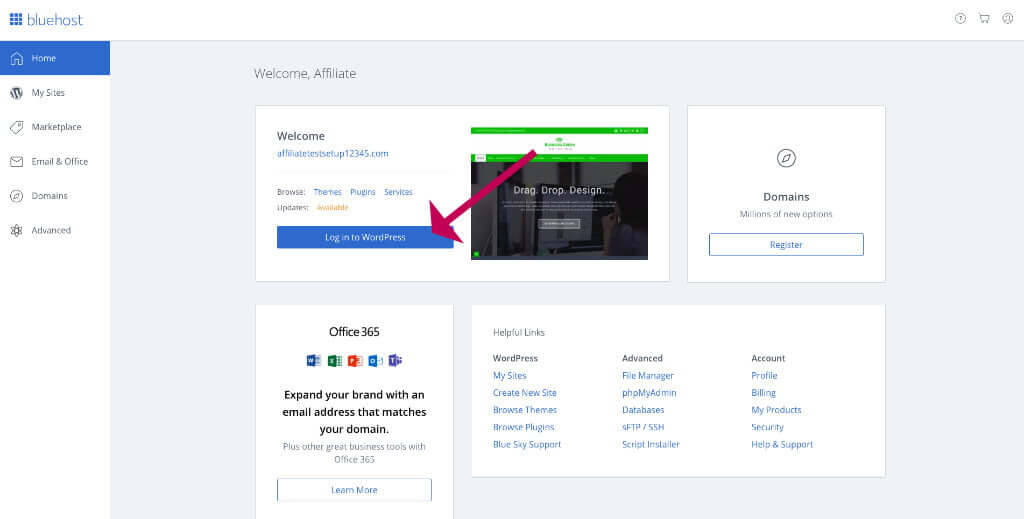
Step 4 – Finish Setting up Bluehost Account

- Click the Create Account button
- Then click the blue go to login button on the next screen
- On the next screen login with your new password
You now have a Bluehost account and a new domain for your fantastic new blog!
Next, we will set up your new blog.
Step 5 – Setup up WordPress
Now we are down to the pointy end of things! In just a second you will have your blog “shell” in place!!
- On the next screen, enter the name of your business (website without the extension). “Your Blog Online“
- Next you enter a tagline. The Tagline is a short description of your business which, in addition to the name gives customers an idea about the blog. ie: “helping you launch your blog, your way!”
- Choose a Blog format if you are launching a blog. Or deselect if it’s to be a straight website.
- If you have a product ready to sell immediately select the online store option. Otherwise, deselect. You can always add this option later when it’s needed.

- Now you answer a few more questions to let Bluehost know what other things you might need n your WordPress account.
- Choose the top option of “Share my ideas and images”.
- Next, think about what your website will be used for. Then select any other options that seem to fit your needs. Again this is not critical as options can always be added later.

Step 6 – Choose a Temporary Theme
Choose a temporary theme from one of the standard templates. This will be changed when we get a little further into things.
Choosing a Theme is a BIG deal, so we won’t rush it!
I have a great post here to help you later: How To Pick a WordPress Theme. The temporary theme will allow us to take a poke around WordPress and get a feel for things whilst we contemplate our style and voice.
You’re all done!
Now, wait while Bluehost automatically installs WordPress for you.
Special Note Non-Bluehost Registrar
If you purchased your name through an alternative registrar such as Namecheap, Crazy Domains, or GoDaddy, it will take a little longer for the DNS records to be associated with your Bluehost website address. This means it may be 24 hours before you can access your site.
Step 7 – Log in to WordPress
When the installation is finished you should find the option on the Bluehost control panel to Login into WordPress.
Log in and select dashboard. Take a look around. Don’t worry, you can’t break anything. You will notice headers for posts, media, and pages. Some will have sample text to show you how the platform works.
I will tell you what that’s all for in upcoming stories.
But for now, we have more work to do.
Step 8 – Next Step New Blog
Starting a blog is a matter of putting one foot in front of the other. As long as you keep taking small steps it will all come together nicely.
Now that you have the website shell in place you can choose to work on a number of different areas.
Each of these topics brings its own question. For example, the Theme, will you choose a template theme or commission a custom-built theme? Don’t worry I have written a guide on all the things to consider. Just click the links to follow.
- Design, branding, theme, logo, and styling aspects of the website.
- Structure, must-have plugins, Google Analytics, Set up Menus, Set up categories
- Social Media, set up all social media accounts for your new website so the handle is reserved.
If you would like tutorials and tips feel free to join my growing group of bloggers!
Affiliate Disclosure
The content on this site is reader-supported. This means if you click on some of our links, we may earn a small commission. You will never be charged more, and in some cases, it may cost less due to arrangements I have with suppliers. Please see my complete disclosure policy for more information.